Tuesday, July 5, 2011

Floors, we've got you covered (almost)

Our time in a trailer has been very productive I think, especially considering all of the holiday and birthday events we've had to attend over the last couple of weeks.  Between fathers day, two different birthdays, and the 4th of July; we haven't had a full weekend to work on the house. But we've squeezed in what we could.  Here's a little breakdown of what we've accomplished this weekend.

Staining the Concrete Floors

Step one, we cleaned the floors with a degreaser and a janitor style buffer to get all the crud loose.

Next, we took the Shop-Vac and sucked up all the gunk that was left behind.

I was pleased with how clean they got just from that. No clay spots, no dirt.  The total filthiness of the floor was really killing me, so now I'm a bit happier :)

Step two, etching. We used the stuff I talked about in previous posts, Eco-Etch. I thought the stuff kinda smelled good, but maybe that's just me.  Anyway, we used a garden sprayer to put that on...let it set for about 30 minutes, came back and roughed it up with a stiff bristle brush and then let it sit for a few more minutes before spraying the floors with the hose to deactivate it (carefully, so as not to spray the drywall) and then again with the Shop-Vac to get it up.  I didn't get any action shots of the etching, but here's an aftershot.

Step three, stain.  Next, I put the stain into a paint tray and used a deck staining pad to put it on the floor.  That took a bit of a learning curve, but we started in the gym so it's no big deal...we'll be putting rubber mats down there eventually so it will be covered up if it looks like crap! (Which, honestly, it kinda does...we learned quick with the swirl marks, but forgot to go back and fix where we started).  I did this barefoot because I kept getting it on my shoes and tracking it to places that weren't ready to be stained yet.  Then I moved to socks and after those got ruined I just gave up and went barefoot.  It was easy to tell if I had something on my foot that would track, and it was easy to get off with a rag. I'm not necessarily recommending this as an application method, but I just got tired of fighting it and said who cares if I have brown feet :)

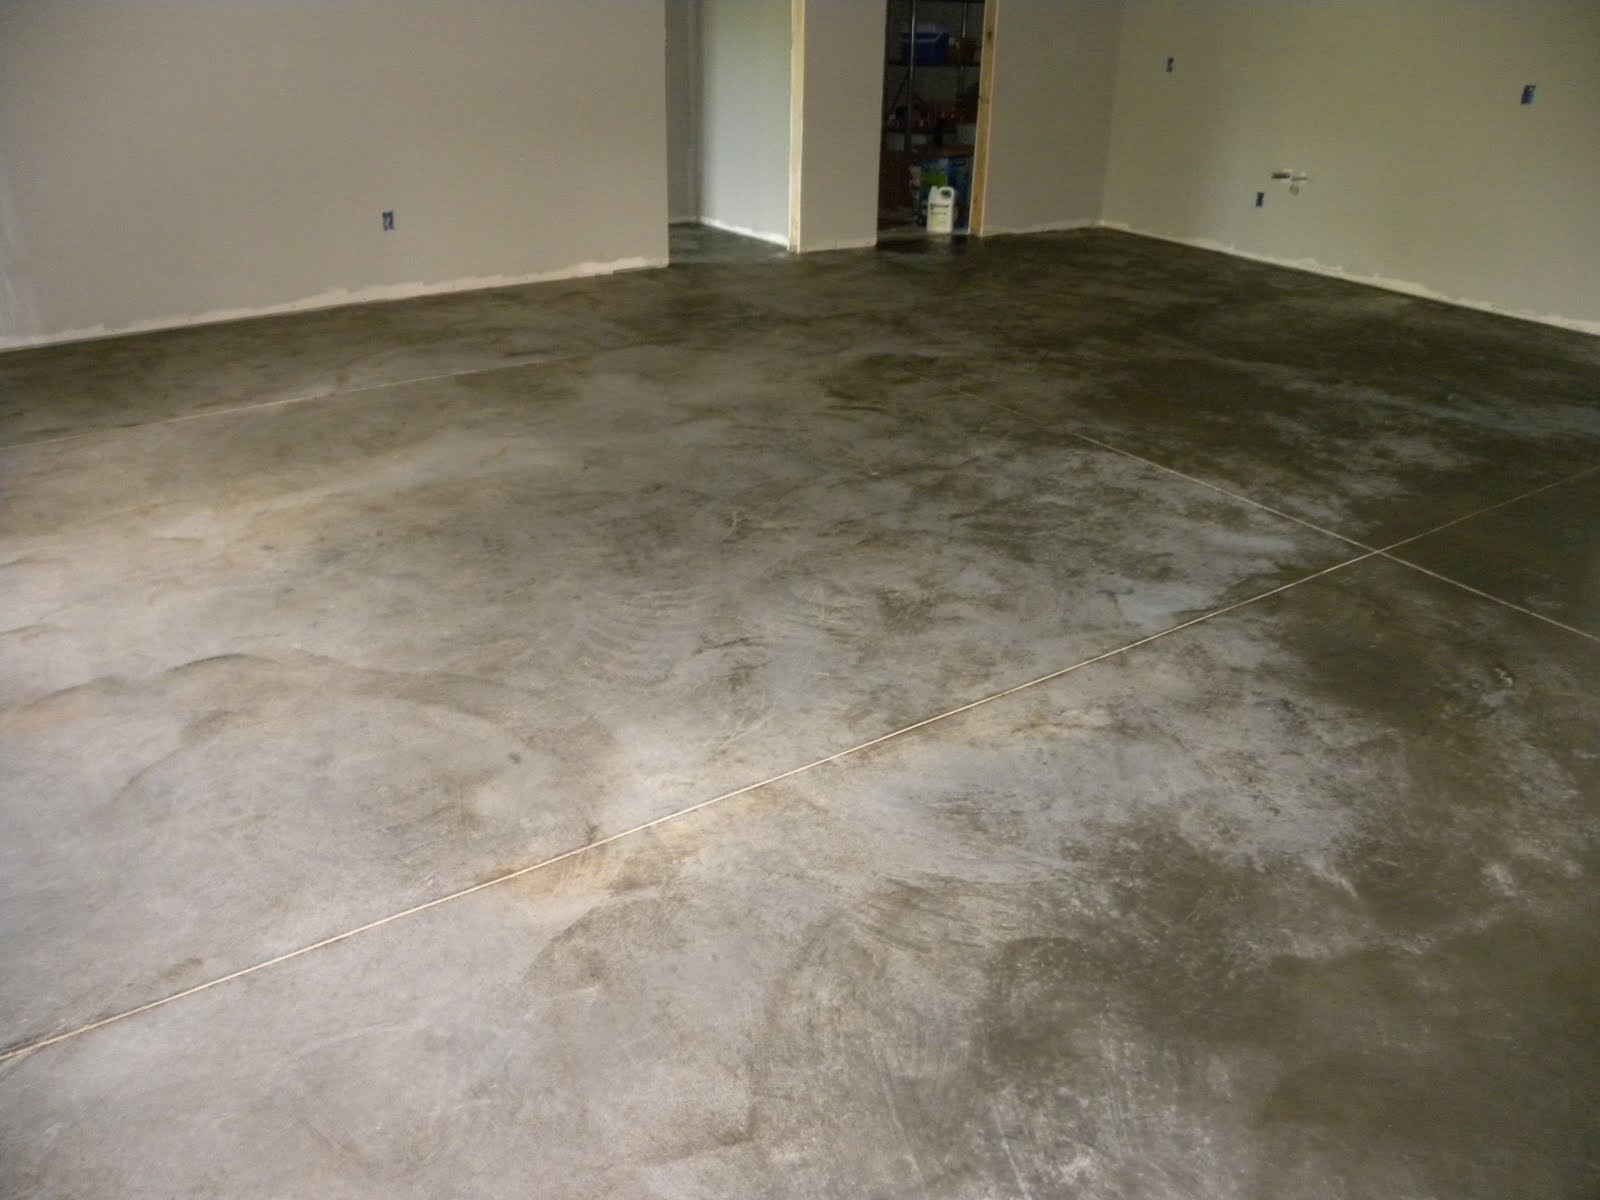
Here's the family room about 3/4 done...don't mind the footprints, we got those cleared quickly :)

 This is the office, laid it a little thick here and had to do some major spreading to thin it out enough.

 Here's a view from the stairs, the last place we stained so we could make sure to have an escape!

This was a "hold the camera around the corner and take a shot" picture after we were done staining.

Now, at this point I would like to note something.  The color we chose was Charcoal Black. I'm not sure if it's just this color or what, but the can says 400-600 sq ft./gallon.  I, accordingly, ordered 4 gallons.  Guess how many I used.  Less than one. The stain was SOOOO thin.  When I used the samples (earlier post) the Charcoal Black was the same, but the other colors were not that thin. I thought it was just an old sample or something.  The other colors were more of a paint consistency, maybe not that thick, but closer to paint than water.  So, I'm not sure why, but I managed to squeeze 4 times the spread rate out of the Charcoal Black.  If anyone with Soycrete experience has any insight into that, I'd be happy to hear it. I was worried that it wouldn't turn out the color I wanted or we didn't etch it right or something, but I don't think so.  We are having a drying problem now, but there are spots that get direct sun that have dried PERFECTLY to what I wanted.  The spots not in the sun though, still wet after two days of dry time. So much for seal it after 6 hours!

You can see in this picture, after 16 or so hours of drying, the stuff on the left gets direct sun.  The stuff on the right, not so much.

This is a better shot of the aforementioned "stuff on the right" that didn't dry.

Another example, office closet.  Really, very not dry.

The office itself...also, not dry.

The bathroom, not even close.

I'm going to try to wipe up an inconspicuous area to see if that will be ok or if we need to bring in a dehumidifier. Something's got to give here.  We'll see what happens. I'll get back to you and let you know if I ever get to move on to step four, sealing.

Tiling the Master Bath

While we were waiting for the stain to do it's thing, we moved on to tiling. We're using 18x18 tiles and 1/16in grout lines.  We started by dry fitting everything and making the cuts...theoretically that should have made the the wet application much easier...theoretically.

Here I am, making mark ups for the last cut in the water closet. This is the dry fit stage, so I'm not walking on freshly placed tiles with thin-set...but I will later after my dry fit cut doesn't quite work out...I got it fixed, sort of, but it's around the toilet area.  No one will see that, right?

Here's Casey, being all buff.  He asked me not to post this picture, but I had to show him doing something in this tiling process...he did help, even gave me the shirt off his back so we could wipe the tiles to get the water off from the tile saw before I placed them. The bonus, I got some eye candy while I was working...eat your heart out Scooter B. 

So since we had a birthday event to attend, we had to cut it short. This is all we got done the first day, but that's quite a bit if you consider we went all the way into the water closet (on the right, behind the wall) and all the way to the shower (the opening on the left) and didn't start until 10:30 because we had to run into town to get some supplies.

Same progress, different angle (into the shower area)

The next day, this is what I accomplished with my Mama as my helper this time (Casey had to work, I took off this whole week).  Our only deterrent to completion, we ran out of tile...oopsie.

The next few pics are just more angles of what I got done today. We'll order more and finish up later.  The kitchen tile should be in tomorrow though and I get to work on that. Then you'll have some real visual of the kitchen decor.  Anyway....back to the bathroom for a few pics.


While all of this excitement was going on, we finally got our front and back porches poured. Didn't get a pic of the back porch, but here's a view of the whole front of the house with the front porch done.  The masonry is also done, except what is going on the front porch columns.  Exciting stuff guys. Exciting.  Stay tuned for more of the DIY home building process.


Monday, June 20, 2011

Yeah, I live in a trailer...so what.

So I've got a bit of sad news for you all...the blogging will be even less frequent than it already is. How is that possible when posts are already so infrequent? Well, strip away my internet access and that's how. Here's the run down...

We got the word two weeks ago that we had renters for our old house...who needed to move in asap. They had lost their house in a storm and needed a place. I said "give me two weeks and we'll be out". But we didn't really have anywhere in particular to go...the scramble began. Hence the two to three week delay in posting...I was kinda busy finding a temporary home. Anyway, we considered moving in with relatives but both of us really wanted to live close to the construction site since we'll be working on it so much and the extra travel time would have really been hard on us (the most willing relatives live even farther from the new house than we did in the old house).  So it was suggested that we rent a trailer and move onto the land while the house is being finished. Great idea. Except it's crazy expensive to rent one of those things and the cash flow's not so great right now with all liquid funds going into construction costs so buying one (even a cheap one) wasn't really an option either...then an idea hit us.

Our neighbors at our old house had an old school travel trailer (circa 1969) that was out of commission due to flat tires and registration deliquencies. We offered to buy a new set of tires and pay a modest rent if they would let us use it.  They said no. They wouldn't take rent...jackpot! So as of this weekend we live in a trailer about 100 yards from the house. I never thought I would be happy about living in a trailer, but its kinda nice already living out there. Charlie digs it, I think.

First night in the trailer...tornado warnings. Seriously. Around 12:00am we had to scramble to the house with Charlie tucked under Casey's arm.  We sat in camping chairs in the basement until 2:15am. What a way to welcome us to the neighborhood, mother nature :)  We made it through though so I'm taking it as a good sign rather than a bad one.

No real further progress on the house to speak of.  Masonry is done on the front, priming is completely finished now and HVAC is in. OH, that's a story...the first day with AC was a nightmare.  Builder Bob called me and said the AC was in so I went up to the house to check it out. What I found was a garage full of water, leaking from the attic through the ceiling. Apparently, the AC guy used a broken elbow somewhere and the sheetrock guy rocked over the overflow drain causing significant damage to the drywall on the ceiling.  We won't have to pay for the damage, but still it's annoying. I freaked out, let me tell you.  Anything having to do with water is a concern.  But AC is great now. Nice to finally have central air. Although the AC in that little trailer freezes us out at night, so I'm not complaining about no AC at this point.

Anyway, tile is expected to be in tomorrow.  This weekend we start on staining the concrete floors downstairs.  I'll try to post but no promises since the trailer doesn't have high speed internet. Bummer. I'll do what I can, when I can. Until then...I'll be working my rear off.  You'll see pictures of it eventually, I promise.

Besos

Sunday, May 29, 2011

Modest Exploration of the Color Wheel

We are almost finished with gray...almost, one room to go.  But we needed to move on and get paint on all the areas that we will be tiling just in case we don't finish. Have to make sure those areas get done so we don't get any on the tile.

Anyway, we've moved on to other colors, Hot Springs and Beach House to be specific (Valspar color names I believe, but color matched again at Sherwin-Williams).  First I'm going to put up some pictures of the other gray areas I haven't shown you yet. Then I'll move on to the new colors and explain them.

Here are the columns painted gray.

Here's the area over the kitchen.

Fireplace

Coming into the hallway from the garage

Hallway looking out of Bedroom #2 (aka the nursery) into the garage.

Upstairs bathroom, looking in.

Upstairs bathroom, looking out

 The columns again

Going down to the basement

Looking back up from the basement

Turning the corner at the stairs in the basement

The mini-hallway across from the stairs, looking into Bed #3

The family room in the basement, just trimmed in color

The future bar area, also just trimmed

1/3 done with that wall of the basement

And it's done...just has to dry now.

Looking at the stair landing in the basement

And that wall is now 3/3 done :)

OK that's about all the gray excitement I have for now. So on to the post's namesake, other colors.

HOT SPRINGS!
I promise, it's not gray. It's actually greenish gray, he he he.  So I'm into gray, so what? It's my house and I'll paint it whatever I want.  (Notice I say whatever I want, not we want.  That's because Casey has officially agreed that I get to make all the decorating decisions and he won't say anything as long as I get no input on whatever truck he wants to buy in the future.  With that being said, I'm going to have some kick a$$ schoolhouse pendant lights over my island now that he originally had vetoed...they're back in baby. But I digress.) Plus it's really not that gray looking in person.

Master bath, vanity area freshly painted

Another view of the vanity area, also a view of the toilet room.  We ran out of paint and had to get more, hence the half done wall.

Another vanity area view

Master closet, our first dry shot. Lighter here obviously because the light is better from the window, but it is lighter once it's dry too.

Another view of the master closet.

Same angle, just without the window in there to mess with the camera's interpretation of the amount of light in the shot.

Here's the vanity area again, but dry this time. See, it did lighten up.  It's still a little dark in there though, but once we get some lights up it will be perfect.

The toilet room in the master bath

BEACH HOUSE!

The laundry room looking in

I swear it's the same room, just looking out.  The first picture its a better representation of what the color actually looks like in person.

Again, same color just in the office, which is in the basement. Kinda looks a little gray there.  It's not, not even a little, I promise.  It must have been the lighting again.  That first picture is really the most accurate.

 Office again

Running out of paint...yet again.

And Sherwin-Williams here we come again! We're out. One more gallon should finish this area and the closet.

Now here's the question for my followers...or anyone else who wants to put in their two cents.
Casey and I aren't sure about what to do with the ceiling in the master.  He doesn't think we should paint any part of the tray ceiling the same as the walls. He thinks it should just be ceiling white.  I've numbered the areas so you can see what I'm talking about...

First off, the wall area marked #4 will be painted a blue color and we agree that the ceiling areas, noted with #1 will remain unpainted like the rest of the house.

The debate:

He says areas marked 2 and 3 should be ceiling white. Ponder that a moment. We'll call it option 1.

I say we do one of three things...

Option 2: Areas 2 get painted the wall color (blue) and area 3 gets painted ceiling white...or...

Option 3: Area 3 gets painted blue and areas 2 get painted ceiling white.

Option 4: Paint all of areas 2 and 3 blue.

Let me know what you think. Post a comment and tell me which option you like...or heck, you can really muddle things up and throw in another option to consider. If you do that then it had better be worth it, because it will just add to my irritation with not knowing what to do with this.

And something to end on...some reptile or amphibious creature (I believe I've mentioned it in another post) has laid eggs in one of the puddles around the house.  They hatched the other day and now we have this...Casey thinks its tadpoles. I kinda think it's cool, part of living in the country... unless someone says it's unsafe in which case we'll take care of it.


Have a great Memorial Day tomorrow everyone.  Hope you've enjoyed the weekend so far!

Total Pageviews